Hosting containers on AWS for teaching
Scripts to deploy multiple docker containers simultaneously for teaching. Below you will find the documentation. Are you new? Have a look at the tutorial
A note on security
The connections between the participant and the container will be through http, and are therefore not encrypted. Therefore:
- No sensitive data in the hosted container
- Do not let participants choose their own password
- Be careful with downloading executable files
- Do not re-use the IP of the host machine
- (If possible) restrict the IP from which to approach the host machine
We are currently developing scripts and docs on how to host containers with a reverse proxy over https. You can find it here: https://github.com/GeertvanGeest/AWS-docker-nginx
Preparation
Start an AWS EC2 instance with an Ubuntu AMI. If you are new to this, here is a good place to get started.
Here’s a repository that automates the start of an EC2 instance with terraform.
If docker is not pre-installed in your chosen AMI (it is pre-installed in e.g. the Ubuntu deep learning base AMI), install docker on the instance:
curl https://get.docker.com | sh
sudo usermod -a -G docker ubuntu # ubuntu is the user with root access
sudo service docker start
You can add the above code to the code run at initialisation. Otherwise, logout and login again to be able use docker without sudo.
After that, clone this repository:
git clone https://github.com/GeertvanGeest/AWS-docker.git
Generate credentials
You can generate credentials from a comma separated list of users, with two columns: first name and last name. Do not use column names. Here’s an example:
Jan,de Wandelaar
Piet,Kopstoot
Joop,Zoetemelk
Run the script generate_credentials.sh like this (use -l to specify the user list):
./generate_credentials \
-l examples/user_list_credentials.txt \
-o ./credentials
-p 9001
-a 18.192.64.150
The option -o specifies an output directory in which the following files are created:
input_docker_start.txt: A file that serves as input to deploy the docker containers on the serveruser_info.txt: A file with user names, passwords and links that can be used to communicate credentials to the participants
The option -p is used to generate an individual port for each user. Ports will be assigned in an increasing number from -p to each user. So, in the example above, the first user gets port 9001, the second 9002, the third 9003, etc. Be aware that port 9000 and 10000 are reserved for the admin containers!
The option -a specifies the address on which the container will be hosted. This is used to generate the address per user. If you have already started your instance (or if you have an elastic IP), specify the public IPv4 address here.
Deploying containers
The output generated by generate_credentials consists of two files. One of them is called input_docker_start.txt and should look like this (if you wish, you can also choose to generate this yourself):
9001    jdewandelaar    OZDRqwMRmkjKzM48v+I=
9002    pkopstoot   YTnSh6SmhsVUe+aC2HY=
9003    jzoetemelk  LadwVbiYY4rH0S5TjeI=
Each line will be used to start up a container hosted on the specified port and accessible with the specified password (third column). Once deployed, the jupyter notebook or rstudio server will be available through [HOST IP]:[PORT]. If you want to have both rstudio server and jupyter notebook running on the same instance, you can generate two tab-delimited files (one for rstudio and one for jupyter) and give them the same passwords for convenience. Note that each container uses a single port, so the files should contain different ports!
Deploy containers based on jupyter notebook
Prepare an image that you want to use for the course. This image should be based on a jupyter notebook container, e.g. jupyter/base-notebook, and should be available from dockerhub.
Run the script run_jupyter_notebooks on the server:
run_jupyter_notebooks \
-i jupyter/base-notebook \
-u examples/credentials_jupyter/input_docker_start.txt \
-p test1234
Here, -i is the image tag, -u is the user list as generated by ./generate_credentials.sh, and -p is the password for the admin container.
No username is required to log on to a jupyter notebook.
To access the admin container, go to [HOST IP]:10000
Deploy containers based on Rstudio server
Prepare an image that you want to use for the course. This image should be based on a rocker image, e.g. rocker/rstudio, and should be available from dockerhub.
Run the script run_rstudio_server on the server:
run_rstudio_server \
-i rocker/rstudio \
-u examples/credentials_rstudio/input_docker_start.txt \
-p test1234
See above for the meaning of the options.
The username to log on to rstudio server is rstudio.
To access the admin container, go to [HOST IP]:9000
Deploy containers based on vscode server
Prepare an image that you want to use for the course. This image should be based on a image linuxserver/code-server image, and should be available from dockerhub.
In the docker file you can install code-server extensions with /usr/local/bin/install-extension.
Run the script run_vscode_server on the server:
run_vscode_server \
-i linuxserver/code-server \
-u examples/credentials_vscode/input_docker_start.txt \
-p test1234
See above for the meaning of the options.
To access the admin container, go to [HOST IP]:7000
Restricting resource usage
To prevent overcommitment of the server, it can be convenient to restrict resource usage per participant. You can do that with the options -c and -m, which are passed to the arguments --cpus and --memory of docker run. Use it like this:
run_rstudio_server \
-i rocker/rstudio \
-u examples/credentials_rstudio/input_docker_start.txt \
-p test1234 \
-c 2 \
-m 4g
Resulting in a hard limit of 2 cpu and 4 Gb of memory for each user. By default these are 2 cpu and 16 Gb of memory. These restrictions are not applied to the admin container.
Container & volume infrastructure
There are three volumes mounted to each container:
- The volume
datais mounted to/data. This volume is meant to harbour read-only data (e.g. raw data). - The volume
group_workis mounted to/group_work. The group volume is meant as a shared directory, where everybody can read and write. - Each user has a personal volume, named after the username (output of
generate_credentials). This volume is mounted to/home/rstudio/workdir/for rstudio,/home/jovyan/workdirfor jupyter, and/config/projectfor vscode.
Below you can find an example of the container infrastructure. Blue squares are containers, yellow are volumes. Arrows indicate accessibility.
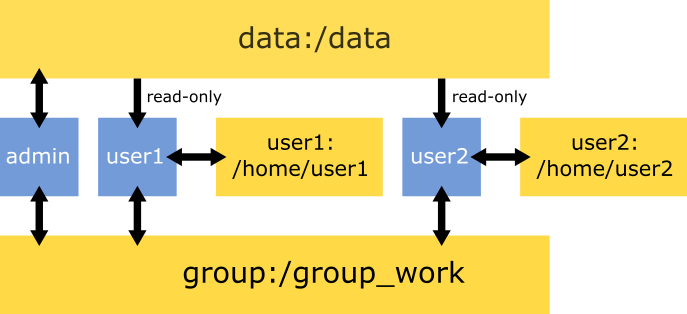
How to use admin privileges
The admin container (i.e. with sudo rights) is available from port 10000 for the jupyter containers and 9000 for the rstudio containers. The regular users at the ports specified in the tab-delimited text file.
You can check out a user volume with mount_user_volume.sh:
./mount_user_volume.sh user01
This will create an ubuntu container directly accessing the home directory of user01. As an alternative to this ubuntu container, you can mount the user volume to any other container.
Stopping services
You can stop all services (containers and volumes) with the script stop_services.sh.
Setting up a backup
With the script backup_s3.sh you can sync files from the docker volumes to s3. It will sync the shared volume group_work and the invidual user volumes. In order to run the script, first configure AWS cli on the server:
aws configure
More info about configuring AWS cli here.
After that, we can specify a cronjob, to sync these files regularly. The script scripts/backup_s3_cronjob.sh calls backup_s3.sh and can be used in your cronjob. To do this, first edit scripts/backup_s3_cronjob.sh:
#!/usr/bin/env bash

cd /home/ubuntu
AWS-docker/backup_s3 \
-u [CREDENTIALS input_docker_start.txt] \
-s [EXISTING S3 BUCKET] \
-e [DIRECTORY IN THE BUCKET (newly created)] \
2>> cronjob.err
Now run:
crontab -e
And add a cronjob. E.g. for every hour you can add this line (use a full path to the cronjob script):
0 * * * * /home/ubuntu/backup_s3_cronjob.sh