Setup + UNIX refresher
Learning outcomes
Note
You might already be able to do some or all of these learning outcomes. If so, you can go through the corresponding exercises quickly. The general aim of this chapter is to work comfortably on a remote server by using the command line.
After having completed this chapter you will be able to:
- Use the command line to:
- Make a directory
- Change file permissions to ‘executable’
- Run a
bashscript - Pipe data from and to a file or other executable
- Program a loop in
bash
Choose your platform
In this part we will show you how to access the cloud server, or setup your computer to do the exercises with conda or with Docker.
If you are doing the course with a teacher, you will have to login to the remote server. Therefore choose:
- Cloud notebook
If you are doing this course independently (i.e. without a teacher) choose either:
- conda
- Docker
If you are participating in this course with a teacher, you have received a link and a password. Copy-paste the link (including the port, e.g.: http://12.345.678.91:10002) in your browser. This should result in the following page:

Type your password, and proceed to the notebook home page. This page contains all the files in your working directory (if there are any). Most of the exercises will be executed through the command line. Here’s a video that explains how to use JupyterLab to use a terminal and work with scripts:
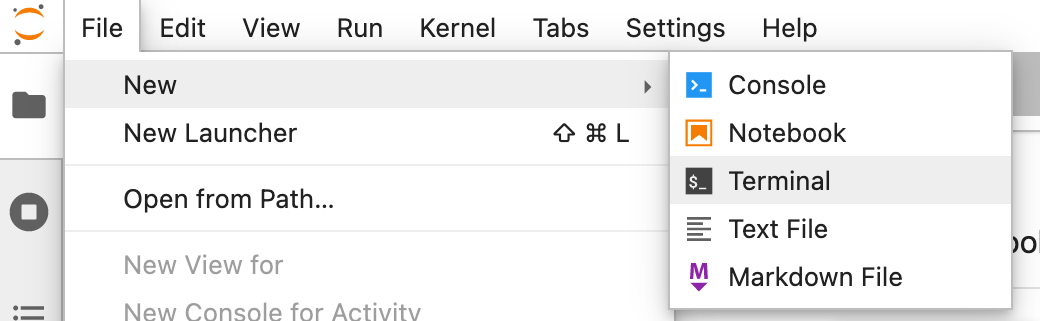
If you rather read, here’s written explanation how to work with JupyterLab. First, let’s open the terminal. Find it at New > Terminal:
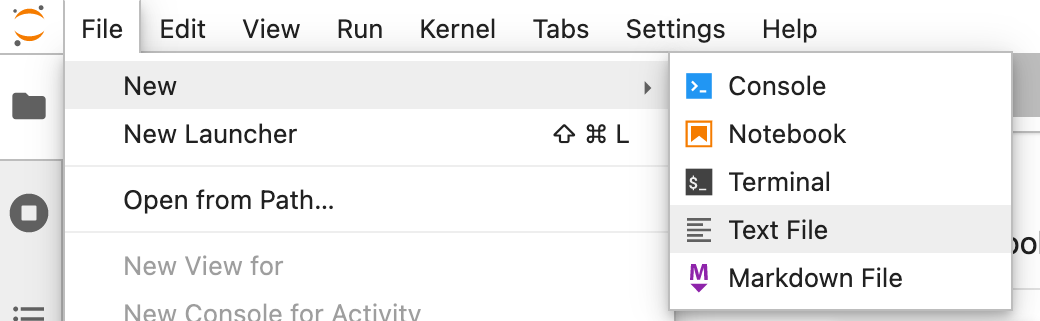
For a.o. efficiency and reproducibility it makes sense to execute your commands from a script. You can generate and edit scripts with New > Text File:
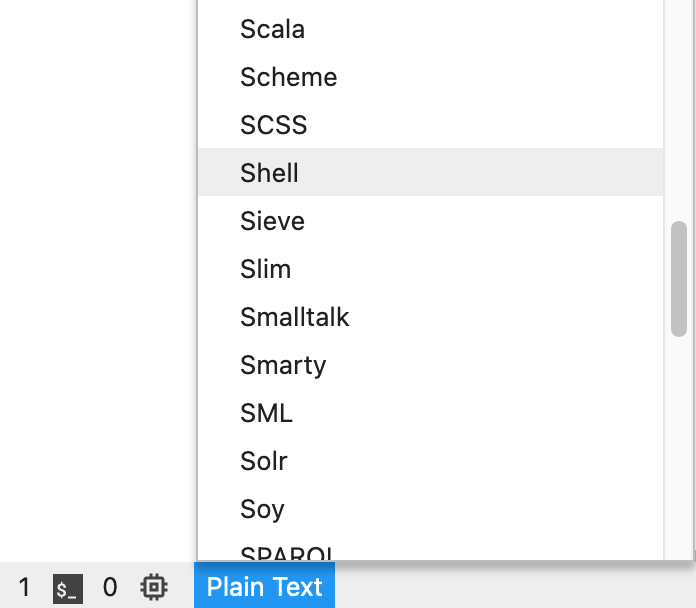
Once you have opened a script you can change the code highlighting. This is convenient for writing the code. The text editor will automatically change the highlighting based on the file extension (e.g. .py extension will result in python syntax highlighting). You can change or set the syntax highlighting by clicking the button on the bottom of the page. We will be using mainly shell scripting in this course, so here’s an example for adjusting it to shell syntax highlighting:
Material
- Instructions to install docker
- Instructions to set up to container
Exercises
First login
Docker can be used to run an entire isolated environment in a container. This means that we can run the software with all its dependencies required for this course locally in your computer. Independent of your operating system.
In the video below there’s a tutorial on how to set up a docker container for this course. Note that you will need administrator rights, and that if you are using Windows, you need the latest version of Windows 10.
The command to run the environment required for this course looks like this (in a terminal):
Modify the script
Modify the path after -v to the working directory on your computer before running it.
docker run \
--rm \
-e JUPYTER_ENABLE_LAB=yes \
-v /path/to/local/workdir:/home/jovyan \
-p 8888:8888 \
geertvangeest/ngs-introduction-jupyter:latest \
start-notebook.sh
If this command has run successfully, you will find a link and token in the console, e.g.:
http://127.0.0.1:8888/?token=4be8d916e89afad166923de5ce5th1s1san3xamp13
Copy this URL into your browser, and you will be able to use the jupyter notebook.
The option -v mounts a local directory in your computer to the directory /home/jovyan in the docker container (‘jovyan’ is the default user for jupyter containers). In that way, you have files available both in the container and on your computer. Use this directory on your computer to e.g. visualise data with IGV. Change the first path to a path on your computer that you want to use as a working directory.
Don’t mount directly in the home dir
Don’t directly mount your local directory to the home directory (/root). This will lead to unexpected behaviour.
The part geertvangeest/ngs-introduction-jupyter:latest is the image we are going to load into the container. The image contains all the information about software and dependencies needed for this course. When you run this command for the first time it will download the image. Once it’s on your computer, it will start immediately.
If you have a conda installation on your local computer, you can install the required software using conda.
You can build the environment from ngs-introduction.yml
Generate the conda environment like this:
conda env create --name ngs-introduction -f ngs-introduction.yml
The yaml file probably only works for Linux systems
If you want to use the conda environment on a different OS, use:
conda create -n ngs-introduction python=3.8

conda activate ngs-introduction

conda install -y -c bioconda \
samtools \
bwa \
fastqc \
sra-tools \
cutadapt \
bowtie2 \
hisat2 \
subread \
entrez-direct \
minimap2
This will create the conda environment ngs-introduction
Activate it like so:
conda activate ngs-introduction
After successful installation and activating the environment all the software required to do the exercises should be available.
If you are doing project 2 (long reads)
If you are doing the project 2 as part of the course, you will need to install NanoPlot as well, using pip:
pip install NanoPlot
A UNIX command line interface (CLI) refresher
Most bioinformatics software are UNIX based and are executed through the CLI. When working with NGS data, it is therefore convenient to improve your knowledge on UNIX. For this course, we need basic understanding of UNIX CLI, so here are some exercises to refresh your memory.
Make a new directory
Login to the server and use the command line to make a directory called workdir.
Answer
cd
mkdir workdir
Make a directory scripts within ~/workdir and make it your current directory.
Answer
cd workdir
mkdir scripts
cd scripts
File permissions
Generate an empty script in your newly made directory ~/workdir/scripts like this:
touch new_script.sh
Add a command to this script that writes “SIB courses are great!” (or something you can better relate to..  ) to stdout, and try to run it.
Answer
You can use your remote script editor to edit your script. Otherwise you can use nano to edit it:
nano new_script.sh
The script should look like this:
#!/usr/bin/env bash

echo "SIB courses are great!"
Usually, you can run it like this:
./new_script.sh
But there’s an error:
bash: ./new_script.sh: Permission denied
Why is there an error?
Hint
Use ls -lh new_script.sh to check the permissions.
Answer
ls -lh new_script.sh
gives:
-rw-r--r-- 1 user group 51B Nov 11 16:21 new_script.sh
There’s no x in the permissions string. You should change at least the permissions of the user.
Make the script executable for yourself, and run it.
Answer
Change permissions:
chmod u+x new_script.sh
ls -lh new_script.sh now gives:
-rwxr--r-- 1 user group 51B Nov 11 16:21 new_script.sh
So it should be executable:
./new_script.sh
More on chmod and file permissions here.
Redirection: > and |
In the root directory (go there like this: cd /) there are a range of system directories and files. Write the names of all directories and files to a file called system_dirs.txt in your home directory.
Answer
ls / > ~/system_dirs.txt
The command wc -l counts the number of lines, and can read from stdin. Make a one-liner with a pipe | symbol to find out how many system directories and files there are.
Answer
ls / | wc -l
Variables
Store system_dirs.txt as variable (like this: VAR=variable), and use wc -l on that variable to count the number of lines in the file.
Answer
FILE=system_dirs.txt
wc -l $FILE
shell scripts
Make a shell script that automatically counts the number of system directories and files.
Answer
Make a script called e.g. current_system_dirs.sh:
#!/usr/bin/env bash
cd /
ls | wc -l